This is a basic overview of everything I know about concert photography, for big and small venues. I’ll hit the more important pieces with a more in depth post a little later.
For some inspiration check out www.jessbaumung.com
Equipment – cameras and lenses
You don’t need a digital SLR, but there are a lot of limitations that surround a point & shoot. When you crank the light sensitivity of a point and shoot, the photo will become ridiculously grainy – and you need a lot of light coming in the lens. It might look good at web size, and it’s also a great way to start to build your portfolio before going DSLR. I used a 3.2megapx Canon S1 IS for a year or so before deciding to invest in a DSLR – the Canon S5is the much improved equivalent of that camera. They cost about $350 off of amazon
and are perfect to learn on before deciding if you want to invest in a DSLR.
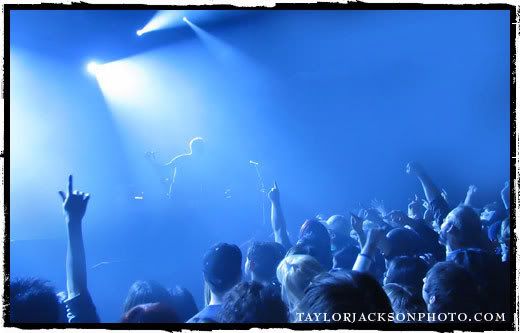
Some photos I took off of my Canon S1 IS:

As long as your point & shoot has full manual controls, it’s perfect to learn off of. You’ll learn what combinations of controls work, and when you feel the limitations of a p&s it’s pretty easy to step up to a full DSLR.
Rules for a p&s:
– shoot in venues with a lot of light
– try not to use your flash unless absolutely necessary (unless you’re doing rear curtain time exposures, more on that later)
– use manual mode ISO around 400 or 800 (whatever still looks good) aperture as small of number as you can get, and whatever shutter speed lets enough light in 1/50 as a minimum
– wait for the lights to get as bright as they can, and use the opportunity to snap a few photos.
DSLRs are under $500, and so beyond worth the money. You only need a barebones DSLR+lens to take great photos, it’s more about the glass you put infront of it.
Inexpensive DSLRS:
Nikon D40 DSLR with 18-55mm![]()
Or
Canon Digital Rebel XT DSLR with EF-S 18-55mm![]()
Would probably be your best bet. Don’t worry about the mega pixels, they don’t matter. It’s all about the sensor quality.
Both are great cameras. They come with a lens that will probably work for 80% of your photography purposes. It’s not a great concert lens, but is useful with a flash….but not the onboard camera flash.
The cheapest (and arguably best lens) you can buy for either of the camera above is either the:
Nikon 50mm f/1.8D AF Nikkor![]()
or the
Canon EF 50mm f/1.8 II Camera Lens![]()
Both are extraordinary in low light photography. If you’re using them you can normally get away without using a flash.
Some of my photos from the Nikon version of this lens:
Currently my favorite lens to shoot with at local and bigger shows is the 85mm 1.8
Nikon version: Nikon 85mm f/1.8D AF Nikkor Lens for Nikon Digital SLR Cameras![]()
Canon version: Canon EF 85mm f/1.8 USM Telephoto Lens for Canon SLR Cameras![]()
Both are great lenses, and the Nikon is probably my most used lens when it comes to concert photography. They’re a little more expensive than the 50mm though.
Cheapest and easiest way to photo a concert:
– Basic body. (D40, Rebel XT)
– 50mm f1.8 lens.
Easy. Cheap. Awesome photos, just learn how to use your camera.
What I currently shoot with at shows:
– Nikon D50 body (it’s been discontinued, the D40 is a smaller, better version of this camera) or my Nikon D200 if it’s a bigger show.
– Nikkor 85mm f1.8 (I use this the most)
– Nikkor 10.5mm f2.8 fisheye (I use this the second most)
– Nikkor 50mm f1.4
– Nikkor 35mm f2.0
I shoot JPEG because I have the right settings on my camera before the show starts, and won’t need to correct a whole lot afterwards.
Starting out/Getting into the show/PR agents
So it’s hard starting out. You can’t afford to buy tickets to show 3 nights a week(and plus, if it’s a bigger show, they wouldn’t let you in with a DSLR..that’s one good thing about having a P&S. If you can’t get a press pass, you can still see a band you dig, and take lots of good portfolio photos…it’ll just cost you a few bucks.)
How to start getting into shows for photographic purposes(for free):
Pay for a few shows, get a bit of a portfolio together. Even photographing your friends jam sessions works. Just prove you’re worth the guestlist spot. Shoot the band a myspace/facebook/email message explaining the situation. I got lucky off the start, and started photographing for a webzine www.truthexplosion.com. So it was pretty was pretty easy to approach bands.
If you’re local area has a webzine, or just a group of people that put their photos on a site, contact them and see what it takes to photograph for them. If you happen to be involved with your highschool/college newspaper, this is a great time to let them know. (provided you’re able to cover the show for the paper)
If you make some great photos for a band in your area, other bands will see. Your name will start to spread. Just tag your photos with your name (and the bands name) or your website/myspace/flickr/wherever you promote yourself. Bands probably won’t be lining up to offer you money to come out and shoot their set, but when you’re good enough they might offer you a teeshirt or a few drinks – something to make it worth your time and gas money. If you can make them look like rockstars at a local dingy dive-bar, you’re on your way to becoming a pro.
Bigger Shows:
In Toronto these would be most House of Blues/Livenation shows.
If you’re wanting to cover bigger shows, and you have some backing (newspaper, somewhat important webzine, magazine, or just a stellar portfolio) you’ll normally have to go through the bands PR rep(or promotions company) for the headlining band. Things get tricky here. Even if you’re approved, you’ll only be allowed to photograph for the first 3 songs of the set, and you won’t be allowed to use a flash…but you’re not using a flash, right?
There’s always exceptions to the the 3 song, no flash rule, but in Ontario, that’s pretty much the going standard.
I’ll go into more depth here when I have the time, but more or less, locate the PR/promotions email, and say that you’re looking for photo credentials for the _____ show on ______ at ________ and you’ll be covering it for ______. If you have an editor that will take care of all of this for, awesome. Some bigger promo companies, and PR agents will require your editor to contact them. Especially if you don’t have an @YourMediaWebsite.com email address.
Local bands:
For the first while it’s pretty cool to be in the photo pit 3 feet away from Jimmy Eat World…or whoever you’re favorite band might be(you get a little shaky the first time), but for me…it got a little tiring. I started photoing local bands that I became friends with, and now I rarely make it to a larger shows. It’s just way more fun for me to go to a show, and hang out with some friends until they go on stage.
Sure, the lightshow isn’t as cool as a big venue, but you can make your own lightshow. http://www.stobist.com will tell you everything you’ll ever need to know about off camera lighting.
Maybe you’ll feel differently, and get into the bigger bands and stay there. If you live in a big city, this is way more likely. I live in Kitchener Waterloo Ontario (an hour from Toronto) and it’s hard to make it up there a few times a week to photograph a show. Not to mention, not a lot of tours even come to Canada (i.e. I end up in Buffalo)
Off camera lighting:
The simple version of it is: get a sync cable, or an ebay wireless trigger. Hold your flash in your hand – directional lighting is amazingly better than a flash mounted on your camera.
I think the first person I saw using off camera was Brooks Reynolds, and forever since I’ve been hooked.
Camera Settings:
Every venue is different. Shoot in manual mode only – i usually use manual focus, but that’s not necessary, AF is ok. Open up the aperture as wide as it can go (ideally f1.8 or 1.4 – but you can work with other lenses with more light..flash or ambient)
My usual settings:
– 1/150 shutter
– f1.8 aperture
– ISO 800 or 1600 or 400
Enough to freeze motion, but not override and flatten the ambient light.
If you’re shooting in a venue with absolutely no available light…or in ‘available darkness,’ and you need to use a flash. I normally shoot with direct flash from high above the left side of the camera. (Flash in my left hand) Settings are as follows:
– F8
– 1/250 or 1/500 shutter
– ISO 200 or 400.
– Flash at 1/8th power.
If there’s some cool ambient light going on, try something more like 1/150 shutter, f4, and a really low flash setting (1/64 or less)
Watch what’s happening:
The way I see it is, 1 great shot is worth way more than 25 average shots. Don’t just track one person around stage – learn to track them through the viewfinder, and keep your other eye open watching everything else that’s happening. It’s a little disorienting at first, but for local bands, it’s a skill worth developing. (It also lets you know what’s going on around you, and saves you from becoming a blind target to anyone in the pit) After a song or two of their set, you’ll start to figure out all the members movement patterns(ie. who moves and who sleeps) and you can start focuing a little more on them. That said, I do my best to get at least one usable photo of everyone in the band. However, I will track the higher energy members a little more.
Post Processing:
– I S-Curve almost all of my photos (in camera, or in photoshop)
– Get photoshop
– If you’re photo isn’t properly exposed, make it properly exposed.
– Calibrate your monitor.
Black and white conversions:
The best method I’ve found is (in photoshop) Image > Adjustments > Gradient Map – and let it to the pure Black and White gradient.
It’s easy, and rarely requires any revision after converting it. This is the method I usually use for weddings too.
Post Concert:
If it was a local show, email the bands the photos that leave the cutting room floor – probably with your name or website attached. It helps market your photography.
If it’s a bigger show, send a link to the photos to whoever got you the photo pass – or start writing the article you promised. If you email the photos back to the PR department of the band, sometimes they’ll find their way to the bands myspace, or website (with photo cred)
Pick your favorites and add them to your /portfolio, and start booking more photo gigs.
Will you ever make a living off of this type of photography? Probably not. Is it one of the hardest types of photography? Yep.
Conclusions:
With concerts, it’s different every time. Like a wedding, it only happens once – if you miss a moment, it’ll probably never happen again. You have to be quick on the shutter button (and why wouldn’t you? you’re shooting digital) and catch every moment you can. I shoot in 3 shot burst a lot, it’s easy to delete photos after the concert, but impossible to recreate the ones you missed. So snag a camera, and get to it. Even a point and shoot works.
Light has far more of an effect on a great photo than the piece of equipment you use to capture the light.
One last tip:
If you’re photos arn’t as great as you want them to be, you’re probably not close enough.
_______________
Categories:
photography
photographer
concert
music
beginner
tutorial
basics
concert photography
music photography
toronto
kitchener
brittany - Do u know what lens works the best for portraits like if i wanted to take pictures of the band back stage? I have a NIkon D40 and the 18-55mm lens but i need to find the best one for portraits.
thanks
BRittany
Richard - Hi Taylor
Thanks so much for this post, I found it incredibly helpful. I’m surprised no-one else has commented on it yet!
One question – to zoom or not to zoom? Your final point is the one I was waiting for, really – how close do I need to get? Obviously if you’re in the crowd, it’s difficult to shoot without a zoom lens, and I’m not sure I’d feel comfortable with an expensive DSLR in a big crowd.
But, let’s say you were in a relatively quiet crowd four or five rows back from the stage, would the 50mm F1.8 lens you mention suffice?
Lastly, I was thinking of getting the Olympus E510 which comes with 14-42mm and 40-150 kit lenses. Do you know of an Olympus-compatible equivalent of the cheap F1.8 lens?
Grateful for any further tips you can give!
Richard
Taylor Jackson - Hi Richard and Britney,
The best lens for backstage portraits would probably either be a 50mm 1.8 or just using your 18-55 with a flash (if it’s really dark)
Bands generally like wider angle shots
Richard,
The concerts I usually photograph are standing room only – or you’ll have access to a photo pit in the front.
You might want to get something a little longer if you’re that far back. An 85mm 1.8 would be a good choice, but i’m not sure if olympus makes anything like that.
Richard - Hi Taylor
Thanks very much for this. I think I’ve now found an Olympus based solution that ticks all the boxes. I’m ordering an E510 with the two kit senses (which are apparently pretty decent).
For concert shooting, I’m going to get an adapter to allow my new E510 to take older OM lenses (under £10 on eBay). This opens up a huge ranges of quality lenses at cheap prices – and because of the OM > 4/3 conversion, I’m told the focal length gets effectively doubled. So I’ll pick up an F1.4 50mm OM lens, and on the E510 it’ll become a 100mm 1.4 . Judging by your advice, this should be awesome for low light shots at gigs 🙂 It’ll probably be manual focus only, but I’m OK with that.
Cheers again
Richard
Taylor Jackson - Hi Richard,
Yah it will probably be manual focus. One thing you might want to look at is if the converter adds a stop to your lens (most of them do)
But even a 100mm 2.4 isn’t bad at all!
I’m glad there’s good Olympus stuff out there!
Taylor
Carrie - I found this extremely, helpful!
I’ll try some of these tips out, and see if i’ve seen a differance in my photos!
Thanks Taylor!
will - ive been doing this a while but have never really looked into anything for help, and i believe this is going to help greatly!! thnk u so much for makn this. if u want to check out soem of my work u can!
myspace.com/wjgphoto
thnx again!
Tobi - Now i have time to thank you for your great tutorial.
It helped me a lot.
Greetings from Germany
Jayman - Fantastic review! so many people talk but you are the one who give the most specs, this is what I and many others in forums have been looking for. Great stuff and great pics, i too started with a S5 Powershot IS but now have a Canon dSLR Rebel XT and do a lot of concerts.
David - Thanks for the advice. I have a Canon G9 and I both love and hate it. I have the worst time in low light situations; concerts, kids indoor sports, etc… It seems whenever I use an ISO higher then 200 the pictures are way to noisy and even some at 200. It seems my aperture will only up up to a 2.8 at most but usually it seems like 3.5 is as wide as it gets. I am sure I am zooming in way to far, aside from that any other suggestions?
canongirl - Thank you Taylor, this is the best blog I’ve read about concert photography.
Alan J - Hey man,
Great Site you got going, helpful and intresting.
I just noticed you live in KW, I recently moved in here from another country and my shooting opportunities are rather limited here and ive not been shooting often, not at all infact.
So since you live here i thought you know about photogenic places and similer stuff 🙂
hope i can contact you on msn or facebook
Keep up the good work !
Jorge Ayon - Taylor,
Thank you so much for sharing your experiences.
Your tips really helped me a lot.
Best Regards,
Jorge Ayon
andriant - nice photos. thanks for sharing 🙂